The plant that breaks the mulching rule
Walk down any May border in Belgium, the Netherlands or southern England this week and you’ll see the same scene: tall fans of grey-green sword leaves, and standing above them the first ruffled falls and standards in apricot, pewter, indigo, the famous near-black ‘Superstition’. Bearded iris (Iris germanica and its hybrids) hits its peak between roughly the 8th and the 25th of May across most of Northern Europe, and a normal year gives you about ten days of bloom on each clump.
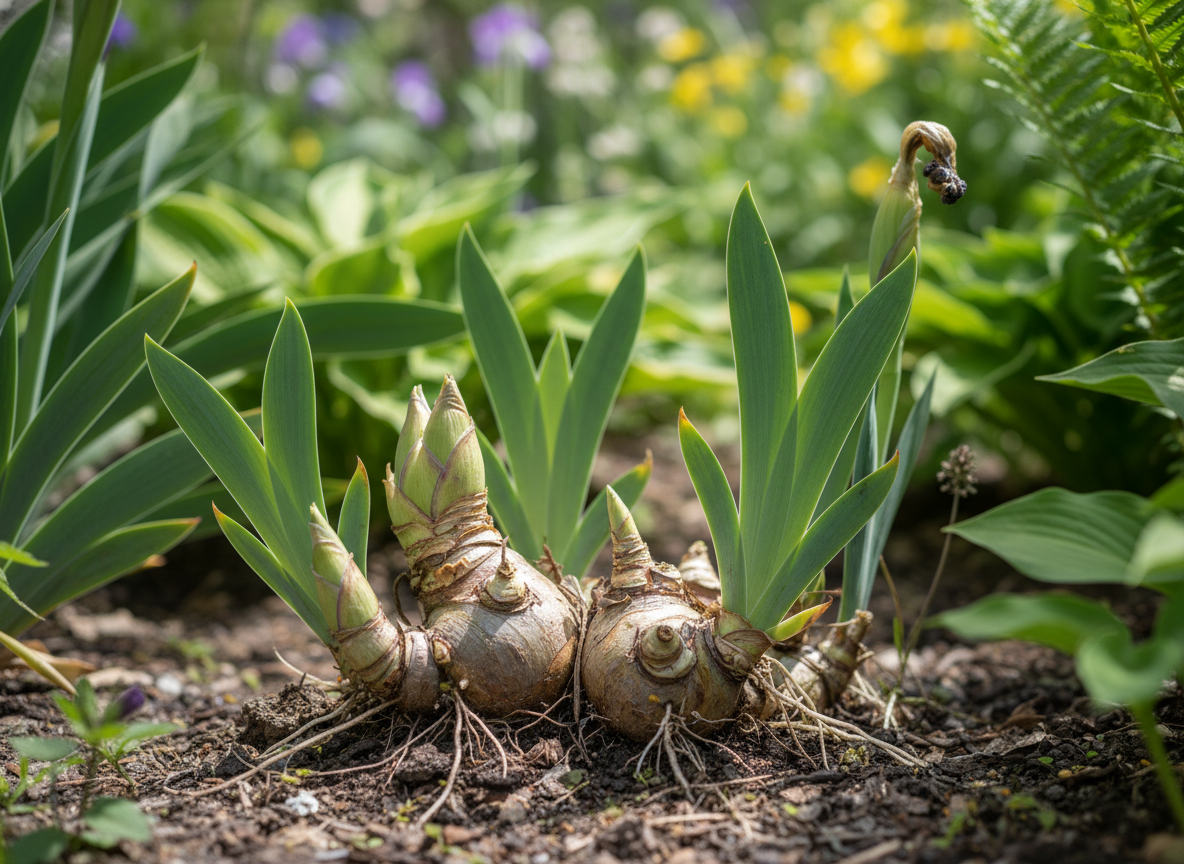
Almost everything else in your border this month — the peonies, the lupins, the geraniums — is happiest when its crown is buried, watered, and topped with two or three centimetres of compost. The bearded iris is the exception. Its rhizome — the fat, knobbly, horizontal stem that creeps along just at soil level — wants to be half out of the ground with the upper surface exposed to direct sunlight. Mulch it in a damp May and within four to six weeks you can be looking at bacterial soft rot dissolving the crown from the inside out.
This is the single most-broken rule in the border, and it’s broken because the advice you read for almost every other plant is right for almost every other plant. Bearded iris evolved in the dry, sun-baked uplands of Anatolia, the eastern Mediterranean and the Caucasus. The rhizome is essentially a sun-warmed energy battery, and the crown chemistry that protects it from rot depends on it staying dry between rains. A wet, dark, mulched rhizome in a Belgian May is a rhizome that has lost the conditions it was bred for.
The RHS still leads its border-iris guide with the same instruction it has used for forty years: “plant with the top of the rhizome just visible above the soil.” That phrasing isn’t decorative. It’s the climate-specific version of “give it sun on its back” — and it’s the only mulching rule in the whole border that says less, not more.
 AI-generated illustration
How to read your rhizomes in the second week of May
Before you do anything else this week, kneel down by each iris clump and part the foliage at the base. You’re looking at the rhizome itself — the horizontal, segmented, almost potato-coloured stem that the leaf fans rise from. Three things tell you almost everything you need to know about the season ahead.
Is the upper surface visible and dry? A healthy bearded-iris rhizome has its top third sitting clear of the soil, looking a bit like a fat green-brown sausage running along the bed. The exposed surface should feel firm to a fingernail press — like a slightly under-ripe avocado. If it’s buried, scrape soil and any old mulch away from the top now. If it’s floppy or squishy, you’ve already got rot and need to act today (next section).
Are the new increase rhizomes visible at the front? Each fan of leaves comes from the front (apical) end of a rhizome. As the clump ages, the back end dies off and the front sends out new sideways “increase” rhizomes. By mid-May you should be able to see one or two new green-tipped increases pushing out at the front of each fan. No new increases on a three-year-old clump means it’s congested and competing with itself, and it goes onto the late-June division list.
Are the leaves leaning over or upright? Healthy bearded-iris fans stand to attention until the bloom stem is up and heavy. A fan that’s lying on the soil at this point in May usually means the rhizome it sits on has lost root anchorage — either from rot below or from frost-heave over winter. Both are fixable in May; both get worse if you ignore them.
That five-minute reading tells you whether the next four weeks are about staking and enjoying the show, or about cutting out rot before it spreads through the clump.
The soft-rot test, and what to do if you find it
Bacterial soft rot — Erwinia carotovora and its relatives, sometimes joined by Pectobacterium — is the disease that turns a healthy iris clump into a slimy, foul-smelling mess in a wet May. It enters through wounds, especially borer damage, frost cracks, or careless trowel-strikes from the gardener. Once in, it dissolves the rhizome’s internal tissue into a yellow-brown ooze that smells, unmistakably, like rotting onion.
The mid-May test is simple. Press a fingernail into the upper surface of any rhizome that looks slightly off-colour. Healthy tissue resists; rotting tissue gives way like soft butter and a watery, sour-smelling fluid wells up around your nail. If you smell it, you’ve got it.
The fix has to happen the same day you find it. Half-measures spread it. The protocol that works:
- Lift the affected rhizome with a hand fork. Don’t try to “treat in place” — the rot travels along the rhizome and you need to see how far it has gone.
- Cut back to clean white tissue with a sharp knife. If the rot has reached past where the leaves emerge, the whole rhizome goes on the bonfire pile (not the compost). If you can cut to clean tissue and still keep a fan, the surgery is worth doing.
- Dust the cut surface with cinnamon or a copper-based fungicide and leave it to scab over for 24 hours in a dry, shaded place. Cinnamon sounds like folk advice, but it’s a reliable mild antibacterial, and it’s the version most home gardeners actually have to hand. The American Iris Society’s regional groups have written about this for years.
- Replant high. When you put the surviving rhizome back, set it so the top half is clear of the soil and the roots fan downwards into a small mound. Water once to settle it, then leave it alone for a week.
Don’t replant into the same hole. Move it 30 cm to one side, into soil the diseased clump hasn’t been sitting in. The bacterium can persist in the soil for months, and replanting into the infected pocket is the single biggest cause of the rot returning the same season.
If the whole clump is gone — slimy, yellow-brown, the leaves pulling out with no resistance — the painful but right move is to dig out everything within a 20 cm radius and not replant iris in that spot for at least a year. It’s brutal, but it works. Replanting into known-infected soil is how a one-clump problem becomes a whole-bed problem the following spring.
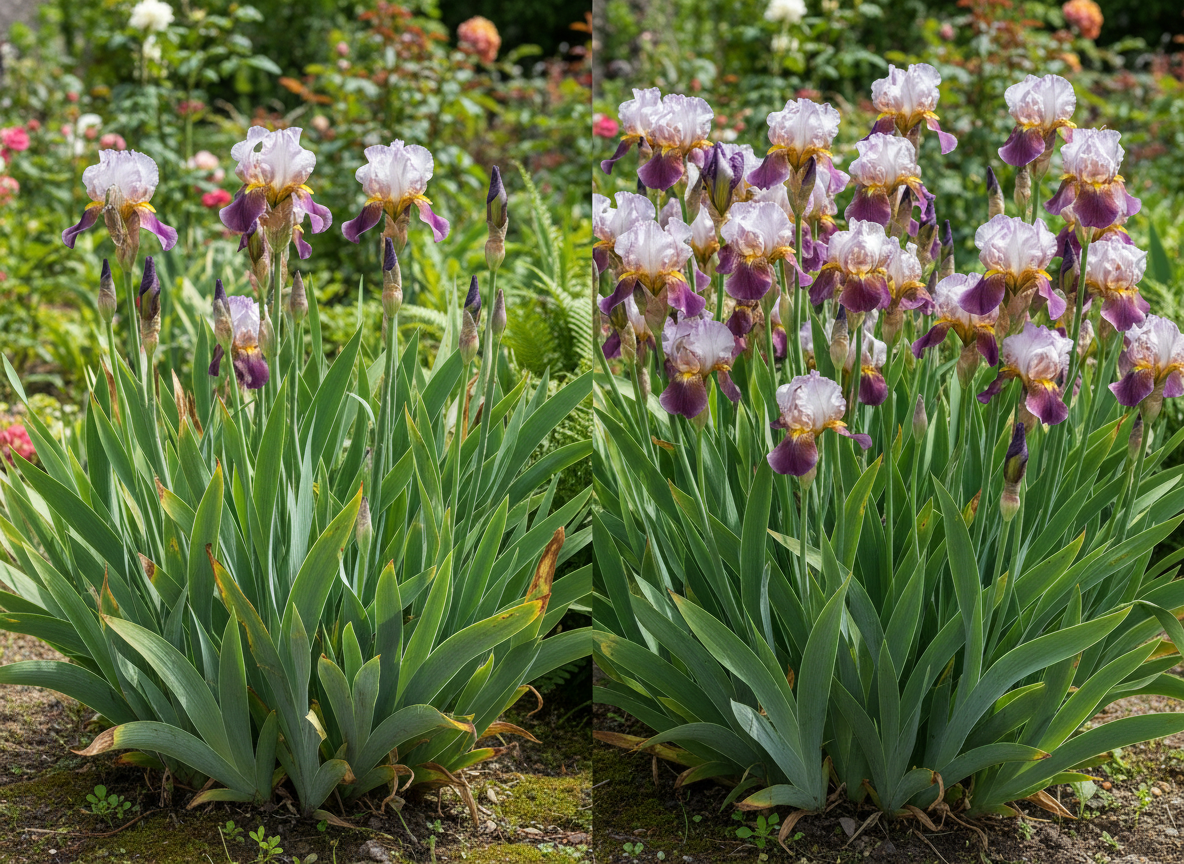 Two images of bearded iris plants in a garden, one with fewer blooms — AI-generated illustration
The fan-trim myth: why magazine advice is quietly subtracting your blooms
Open almost any popular gardening magazine in May or June and somewhere on the iris page you’ll find this line: “After flowering, cut the leaves back to a fan, six inches above the rhizome, to tidy the plant.” The accompanying photo will show neatly trimmed sword leaves rising in a perfect half-fan shape, which looks a bit like a child’s drawing of an iris and nothing like a real one.
That advice is wrong for healthy clumps. It’s right only in a specific context — when you’re physically lifting and dividing the plant — and the tradition of trimming leaves at division has been generalised over decades into “always trim after flowering”. The American Iris Society explicitly lists this as one of the three big myths about bearded iris, and the reasoning is straightforward.
The leaves you’d trim are the ones doing the work that decides next year’s bloom count. From the moment the flower stem fades through to early autumn, the fans are pulling sugars down into the rhizome to fatten it for winter and to lay down the embryonic flower buds that will open next May. Cut the fan in half at the start of June and you’ve cut your photosynthetic surface roughly in half for the rest of the growing season. The plant survives — bearded iris is tough — but it banks less energy, fattens fewer increases, and sets fewer flower buds in the rhizome’s growing tip.
It’s the same logic at work behind why you don’t tie or knot daffodil leaves after flowering, even though it makes the border look tidier. The leaves are the reason next year’s flower exists. Tidying them at the wrong moment is paying for a one-week aesthetic with a year of bloom count.
The right post-flowering routine for an undivided clump is much smaller:
- Snap off the spent bloom stem at its base as soon as the last flower goes over. Don’t cut — twist and snap. The stem is hollow and a clean snap leaves a small wound that scabs over in days; a flat cut holds water and is the single most common entry point for soft rot.
- Remove only the leaves that are obviously dying — yellow at the tip, brown along the edge, or starting to peel. Pull them downwards from the base; they should come away cleanly. Healthy green leaves stay on the plant until they yellow naturally in autumn.
- Don’t touch the green leaves. Not a centimetre. Not for tidiness, not because they “look untidy at the tips”, not because it’s what your father did. The ten centimetres at the top of each leaf includes some of the most efficient photosynthetic tissue the plant has, because it’s the bit that gets the most sun.
The exception is the June or July division window — the six weeks beginning roughly four weeks after flowering. When you lift a clump to divide it, the fans are trimmed back to about 15 cm because the disturbed root system can no longer support full-sized leaves, and the trimmed fan reduces water loss while new roots grow. That’s the only time the trim helps. The rest of the year it costs you flowers.
Staking the bloom stem without snapping it
A well-fed bearded iris in a sheltered border doesn’t need staking. A wind-exposed clump in heavy clay, or a tall variety in its second year before the rhizome ring has thickened, does. The decision-point is right now — the second week of May, when the bloom stem is somewhere between 30 and 60 cm and you can still see how it’s leaning.
The wrong way to stake is the way most of us learned: a single cane jammed in next to the stem and tied at one point near the top. The stem then pivots around the tie in any breeze and either snaps at the tie point or rocks the whole rhizome loose at its base.
The right way is the opposite of obvious:
- Use a single thin cane (a green-painted bamboo, 60 to 90 cm, is fine) and push it in at a slight angle so it leans into the prevailing wind, not away from it.
- Tie at two points — one near the base of the stem and one about two-thirds of the way up — using soft jute or rubber tree ties in a figure-of-eight that holds the cane and stem apart, not tight against each other.
- Don’t tie at the very top. The terminal bud needs room to bend and recover; a tight tie there snaps the stem just below the flower.
- Push the cane down to firm subsoil, not just into the loose top layer. A stake pulled out by a wet wind takes the iris with it.
Tall historic varieties — most of the nineteenth-century French breeds and many of the deep purples — are flop-prone in a way modern dwarf and intermediate hybrids aren’t. If you’ve inherited an old variety from a grandparent’s garden, plan on staking. If you bought a ‘Babbling Brook’ or ‘Edith Wolford’ in the last decade, the stems are usually self-supporting unless your soil is very rich.
 AI-generated illustration
Five mistakes that quietly cost next year’s flowers
- Mulching the rhizome with bark or compost in spring. It’s the right move for almost everything else in the border, and the wrong move for bearded iris. Pull mulch back to expose the top of the rhizome.
- Cutting the leaves into a fan after flowering. Beloved by magazines, hated by the plant. Leave them green and full until they yellow naturally in autumn, unless you’re lifting the clump for division.
- Cutting (not snapping) the spent bloom stem. A flat cut leaves a wet stub that funnels rain straight into the rhizome and is the favourite entry point for soft rot. Snap it off at the base instead.
- Feeding with high-nitrogen fertiliser in spring. Nitrogen pushes lush leaves and soft, rot-prone rhizome tissue. A handful of bonemeal or a balanced low-N feed in October and again in early March is the right pattern; nothing in May.
- Letting the clump sit undivided for five-plus years. The centre dies out, the increases compete with each other, and the bloom count collapses. Lift, divide and replant high in the late-June to early-August window.
What Cresco does with the May reading
Bearded iris is the kind of plant where the right answer in your garden depends on three things a generic guide can’t see: which cultivar you’re actually growing (a tall historic ‘Mme Chereau’ wants different staking than a modern intermediate), how wet the last fortnight has been in your specific postcode (rot risk scales with rainfall and overnight humidity), and how old the clump is (year three is the staking year; year five is the dividing year).
That’s the reading Cresco gives you when you snap a photo of the clump in flower: the app identifies the iris, checks your local weather and soil-temperature curve, and tells you whether you’re in the staking window, the rot-risk window, or the cleanup-and-leave-alone window. It’s also the reason we built the app around plant care specifically rather than identification — there are plenty of apps that can tell you which iris you have; far fewer will tell you whether the patch of pewter-grey on a rhizome you noticed today is harmless weathering or the first hour of soft rot.
If you want a single rule to walk away with: in the second and third weeks of May, kneel down and look at the rhizomes — not the flowers. The bloom is this year’s bonus. The rhizome is next year’s flower already being decided.
Sources & further reading: